Wednesday, March 28, 2007

Peanut Brittle

I've been waiting for a chance to try this recipe from Kate Zuckerman's book The Sweet Life: Desserts from Chanterelle, and a "Food Day" at work tomorrow is the perfect excuse. I like this book a lot; it's well written and contains a ton of information and tips. She shares the pastry chef perspective and that adds so much to a recipe that a novice like myself can understand more than just ingredients and cooking times but also methodology, presentation, and repeatability.

This recipe is a perfect example. Just about every peanut brittle recipe I've seen is basically boiling the sugar, adding the nuts, cooling in a pan, and then breaking into pieces. No frills. The steps Kate lays out allow for variation at certain places while still maintaining your ability to recreate a well-finished piece. Cooling the caramel and grinding it allows you to change nuts within the same batch. Want to do some almond and some peanut? No problem. Another benefit of grinding? It gives you more control over what the final product will look like so you can make circles or tubes instead of broken glass-like pieces. That's just a great way to impress your friends.

Following this recipe made me feel more like a "chef" than a cook, if I may be so bold so obviously I can't recommend this book enough.


Thin and Delicate Peanut Brittle
from page 204 of the The Sweet Life: Desserts from Chanterelleby Kate Zuckerman

1 cup sugar
1/3 cup water
1/8 tsp. cream of tartar
1/2 cup ground peanuts
1/4 tsp. finely ground sea salt

Preheat the oven to 350° F and prepare a 11"x17" baking pan with parchment, nonstick baking pad, or aluminum foil.

In a small, heavy-bottomed pan combine the water, sugar, and cream of tartar and heat over high heat. When the mixture begins a rolling boil, reduce the heat to about medium-high. Once the color changes to a golden brown caramel color, remove from the heat and pour into the prepared pan to cool.

Once the caramel has cooled, break it up into small pieces. Use a food processor or coffee grinder to grind the caramel into a fine table sugarlike consistency. Combine this with the ground peanuts.

Prepare your baking pan again. Pour this mixture into the prepared pan and spread very thin (1/8 inch thick). Bake the candy for about 4-6 minutes, until it melts and bubbles. Remove from the oven and evenly sprinkle the salt over the candy. Let cool and break into pieces to serve.

This will keep for up to 2 weeks in a sealed container in a cool, dry place. Humidity will rob this brittle of its crunch.

Saturday, March 17, 2007

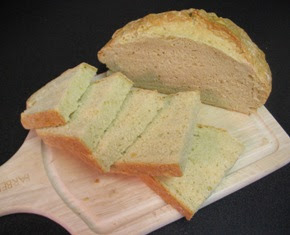
Irish Dairy Bread

St. Pat's Day: Green or Irish

I believe this is the first time I've recognized St. Patrick's Day by baking something instead of drinking something. Previous celebrations took place in various drinking establishments, the best being a little country bar just north of Milwaukee actually owned by an Irishman and not some dork wearing a plastic green hat and calling himself "O'Lucas" all night. But hanging out at Finbar's wasn't about getting drunk. You were there with friends, having a great time, enjoying the atmosphere of real Irish music and food.

Now one of the things you may get during an Irish meal is a couple of pieces of soda bread. This bread is dense but tasty and requires few ingredients and just a little bit of time to make. The leavening is performed by the reaction between buttermilk and baking soda so there's no yeast and no waiting for the dough to rise. I have to admit I was impressed how much this bread rose too. Many muffins use the same buttermilk-baking soda reaction but they don't double in height like this bread did (near the end off baking it came dangerously close to the rack above it).


Irish Dairy Bread
from page 122 of the The King Arthur Flour Baker's Companion: The All-Purpose Baking Cookbook

Makes one 9-inch loaf

4 cups (17 oz) unbleached all-purpose flour
3/4 teaspoon baking soda
1 teaspoon salt
1 tablespoon unsalted butter at room temperature
1 1/2 cups buttermilk

Preheat the oven to 375° F and prepare a baking sheet or cast-iron pot by lightly flouring it.

In a large bowl combine the flour, baking soda, and salt and whisk together thoroughly. Add the butter and distribute the butter evenly through the flour mixture. Create a hole in the center of the flour and pour the buttermilk into it. Stir to combine the ingredients.

Take the dough out of the bowl and knead on a lightly floured surface. Once the dough comes together, form a ball and then press down until it is about 1.5 to 2 inches thick. Cut an "X" into the top and place in the pan. If you are using a cast-iron pot with a lid, put the lid on. Bake in the oven for 35 minutes (for baking sheet) to 40 minutes (for cast-iron pot). Once done, cool on a wire rack. Do not cut until completely cooled.


I've submitted this to Zorra of 1x umrühren bitte and her St. Pat's Day: Green or Irish round-up. I found this blog when I first started reading food blogs, it always has great pictures of bread which I imagine probably taste pretty good too. She also has many of these events, with my favorite, the culinary Advent calender (2005 and 2006).

Tuesday, March 13, 2007

Blackberry Oat Muffins

A couple of weeks ago, the question was posed to Lorrie on what she would do if she couldn't have wheat and would have to lead a gluten-free lifestyle. She loves bread and pasta and she thought it definitely would be very tough. I don't think she was aware of all the resources available online with recommendations and recipes for gluten-free food. So my next trip to the store, I picked up some gluten-free flours. Oat flour was among them. Now I was thinking that since oats aren't wheat, that means gluten-free. I went ahead and made these muffins, thinking I was making something without gluten. Later, after talking to Lorrie about bringing some in for a coworker with Celiac Disease, I double-checked the recipe and the ingredients to be sure. I was using Bob's Red Mill oat flour and when I examined the package, I couldn't find the gluten-free blurb. I thought this was odd and went to the website and found they did not consider it to be gluten-free. Apparently Bob's has a whole facility devoted to gluten-free products and oats are not processed there so their oats are processed in the same facility as wheat, thus contaminating them. I learned something new.

These muffins came out great. Slightly dense and moist, the flavor was wonderful. The blackberry and oat flavors complimented each other well. I had mentioned to Lorrie that she can take them to work and she told me no, we would be keeping these to ourselves. We did and I don't feel bad about that at all.


Blackberry Oat Muffins

Makes about 12-14 muffins

3 1/2 cups oat flour
1 cup instant oats
1 Tbls. baking powder
1 1/2 tsp. cinnamon
1/2 tsp. salt
1 cup sugar
1/2 cup vegetable oil
1 cup whole milk
2 large eggs
1 cup roughly chopped blackberries

Preheat the oven to 425° F.

Combine the eggs, oil, and milk in a bowl, mix well, and set aside.

In a large bowl, combine the dry ingredients (all the remaining ingredients except the blackberries) and whisk to combine. Now add in the blackberries and give a quick stir to cover with the flour mixture. Finally, add the wet ingredients to the flour mixture and stir until everything is just mixed. Don't over mix.

Spoon the mixture into greased or paper-lined muffin cups. Fill each to the top and mound slightly in the center if possible.

Bake for 16-20 minutes. About halfway through, rotate the pan 180°. The muffins are done when a cake tester comes out clean and they spring back when pressed lightly. Remove from the oven, let cool in the pan for about 5 minutes, then transfer to a wire rack to cool.


These muffins were submitted to Sweetnick's for her ARF/5-A-Day Tuesday feature. This is also now a post at Just Baking as well.

Sunday, March 11, 2007

Biscuits in a box

A while back an activist blogger made some disparaging remarks about a fellow blogger's site. Specifically about the site's subject, Rachel Ray. You don't have to love Rachel (or Sandra or Paula or Emeril etc.), but making comments like that blogger did in a public forum was uncalled for. She had her own blog; she should do it there. Well, the same thing bothered Mimi at French Kitchen in America, who declared March 15th "Biscuit Baking Mix Day" and this is my entry.

I thought I would do some variations of biscuits, nothing too complex. I always liked the sweet biscuits - cinnamon, raisins, lots of frosting so that was my direction. Now, one had to be apple, my favorite fruit. The other one, peach, was inspired by a post I read the other day.

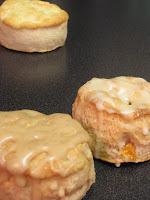
The apple was a Granny Smith, the Bisquick mix was the regular one, and I tried a new Amish, non-homogenized, organic milk. The apple cinnamon is the one with the darker glaze, the "Peaches and Cream" biscuit has the lighter glaze, and the biscuit in the background is the regular biscuit just prior to it being smothered in sausage gravy.

Both biscuits turned out well. The biscuits themselves were a little flour-y and needed the glaze to get each fruit's full flavor.

Apple Cinnamon Biscuits

For Biscuits
3 cups Bisquick Mix
1 cup diced apples
2/3 cup milk
1 1/2 tsp. cinnamon
1 Tbls. sugar

For glaze
1 cup powdered sugar
1/4 tsp. cinnamon
apple cider

Preheat the oven to 450° F and prepare 2 baking sheets if you are doing small biscuits. Combine all biscuit ingredients in a medium bowl and turn out onto board "floured" with Biquick mix. Knead 10 times. Roll out the dough to about a half inch thickness and cut with a biscuit cutter. I used the smallest from my set (1 1/2 inch I believe) for a more bite-size biscuits.

Bake for 10 minutes. About halfway through, rotate the pans 180° and switch the pans on the racks. The biscuits are done when they are a golden brown. Remove from the oven, let cool in the pan for a minute or two, then transfer to a wire rack to cool.

Mix the powdered sugar and cinnamon and then add the apple cider until the glaze reaches the consistency you would like. Dribble the glaze over the biscuits.


"Peaches and Cream" Biscuits

For Biscuits
3 cups Bisquick Mix
1 cup diced fresh peaches
2/3 cup plain yogurt
1/2 tsp. cinnamon
2 Tbls. sugar

For glaze
1 cup powdered sugar
peach juice

Preheat the oven to 450° F and prepare 2 baking sheets if you are doing small biscuits. Combine all biscuit ingredients in a medium bowl and turn out onto board "floured" with Biquick mix. Knead 10 times. Roll out the dough to about a half inch thickness and cut with a biscuit cutter. I used the smallest from my set (1 1/2 inch I believe) for a more bite-size biscuits.

Bake for 10 minutes. About halfway through, rotate the pans 180° and switch the pans on the racks. The biscuits are done when they are a golden brown. Remove from the oven, let cool in the pan for a minute or two, then transfer to a wire rack to cool.

In a small bowl put the powdered sugar and then add the peach juice until the glaze reaches the consistency you would like. Dribble the glaze over the biscuits.

Monday, March 05, 2007

Who eats all the stuff you make?

I get asked this question occasionally from friends who've seen the site. Sometimes it's me and Lorrie. More often than not though, it's Lorrie's coworkers. They get many of the bars, cookies, muffins, and candies I make. Some of the things were made specifically to celebrate some achievement at work for Lorrie, like the orange cookies in the picture. Others were just recipes I wanted to try or an item I needed to make for another site, like the heart cake.
Don't get me wrong, Lorrie and I get our share but neither of us want 2 dozen cookies sitting around just begging to be eaten!

But there is an additional benefit for me. Feedback. How things taste, how they look, etc., I hear what they liked and what they didn't. I can't do better without it.

Thank you. It really is appreciated.

Apple Pizza

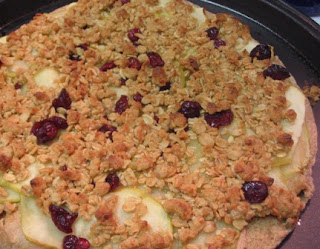
A couple of weeks ago I posted about the whole wheat pizza crusts I made. Well, one crust was used for the regular pizza, the other I used to make a dessert pizza. If you get a dessert pizza from one of the big pizza chains, you're probably going to get a can of pie filling on a crust with some kind of crumble and icing. I tried avoiding that. Instead I used thinly sliced apples and cranberries and topped that with a granola and brown sugar crumble. It really is a version of a tarte fine, a French tart of puff pastry with thinly sliced apples.

This pizza came out really well. I poached the apples in a simple syrup to prevent browning (I was cutting the apples well before I was baking) and to add sweetness. I was a little worried about the crumble because I winged it but it turned out good. The whole wheat pizza crust worked well because its savory flavor and hint of spice cut the sweetness of the other ingredients very well.

Apple Pizza

Makes 1 pizza

1 crust
2 large apples (I used Granny Smith)
1/2 cup dried cranberries

For the simple syrup
3/4 cup sugar
1 cup water

For the crumble
1/2 stick butter (room temperature)
1 cup granola
1/2 cup light brown sugar

Preheat the oven to 425° F. Combine the water and sugar in a medium saucepan and put on medium-high heat. Once it starts boiling, reduce the heat and let the syrup simmer. Slice the apples as thin as you can (this was a good excuse for me to try my new mandolin). Put the apple slices in the syrup and turn up the heat and bring to a boil. Once the syrup starts boiling again, remove the apples and let them drain and cool.

Once the slices are cool enough to handle (careful,boiling sugar is just as dangerous as boiling oil), layer them on the pizza crust. Sprinkle the cranberries on top of the apple slices.

In a medium bowl combine the butter, granola, and light brown sugar. Use a fork or a knife to "cut" the crumble up into little pieces and sprinkle over the pizza.

Place in oven and bake for about 10-12 minutes. Cool slightly, slice, and eat!

Thursday, March 01, 2007

Checking in...

I'm still here, just been busy. My computer crashed last weekend and the good news/bad news is I had some data backed up, some data I was able to squeeze out of the old computer, and now I have a new computer I have to reload software/data and reconfigure to my liking.

Also Lorrie has been feeling a bit under the weather so I've been spending more time with her.

I have baked and have posts in mind and will post them when I have a chance.

February 2007 Just Baking Round-Up

Just highlighting some of the posts I did as editor at Just Baking in February (and one from January) that didn't appear here.

Jan. 31 - Amaranth Flour - Brief overview of Amaranth flour and its uses.

Feb. 6 - In The News - Baking in the news round-up. Layer cakes, madeleines, personal achievement, baking competition, and Ace Of Cakes.

Feb. 7 - A note from the editor - Introducing myself and direction of Just Baking.

Feb. 12 - Welcome to Valentine’s Week - All the Well Fed Network sites ran posts with Valentine's Day themes.

Feb. 16 - A Tip For Your Heart - Tip on how to make a heart cake without a heart pan.


*Update* - As Just Baking no longer exists, I have removed the actual links but left the post names as a source for ideas