For Halloween this year, Lorrie and I had decided to do some kind of baking project. We thought about mailing cookies to some friends and what-not and that was the plan when I left to do the shopping. I was walking through Bev's World looking at the chocolate molds and inspiration struck. I grabbed a couple of the Halloween molds that would be perfect for decorations on the top of...cupcakes! Cupcakes are not things I tried before and I thought this would be a great time to try. I thought I could do some vanilla cupcakes and some chocolate. Instead of frosting, we would roll fondant and use a circle cutter and then put the little chocolates on top. So I picked up the necessary supplies and went home to convince Lorrie that this was the way to go. Eventually, she agreed.
First thing I had to do was make the little chocolate bits to put on top of the fondant. I picked up three molds: one mold that were half inch by one inch and said 'BOO' and two molds that had little half inch square cats, witches, ghosts, jack o' lanterns, bats, and skulls. This wasn't that hard. The candy melts I was using melted easily in squeeze bottles after a couple quick zaps in the microwave. The squeeze bottles let you control how much and where you put the candy so I also reduced the need for scraping. I didn't need the backs to be completely smooth. In fact, I made a point on the backs so it would stick into the fondant and hold its place a little better. The standard color for skulls and ghosts was white, the color for jack o' lanterns and witches (I know weird but it balanced out the number of candies) was orange, and the color for cats and bats was black. To get the black candy I added black candy coloring to dark chocolate melts. For the mold with the word 'BOO' I pretty much stuck to orange and white candy melts. The candies set pretty quick in the fridge since the candies were small and thin. I did try 'painting' the molds a little more this time. With a toothpick and the black candy melts I added eyes to some of the jack o' lanterns and the ghosts and did hats on some of the witches. Still not near perfect, beautifully painted candies but I am slowly getting better at it.
First thing I had to do was make the little chocolate bits to put on top of the fondant. I picked up three molds: one mold that were half inch by one inch and said 'BOO' and two molds that had little half inch square cats, witches, ghosts, jack o' lanterns, bats, and skulls. This wasn't that hard. The candy melts
 For the cupcakes I chose two recipes from a cookbook I ordered a couple of weeks ago, The King Arthur Flour Baker's Companion: The All-Purpose Baking Cookbook
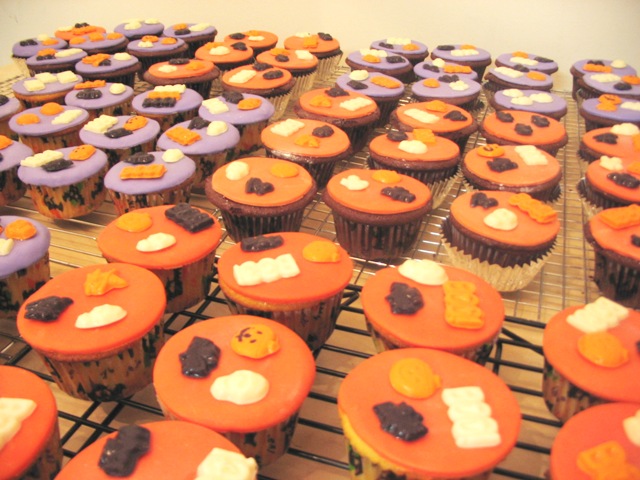
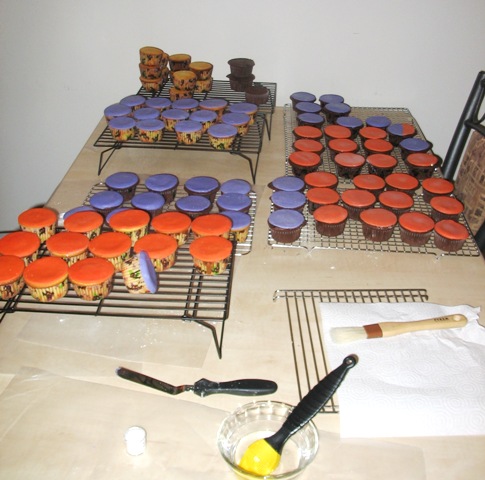 Well, not exactly. Like I said we picked through and got rid of ones that didn't look right and so forth. Mainly it was excluding a lot of the first batch of the yellow cake ones but there were a couple of devil's food cake ones that were rejected. Having chosen the best ones, we set about decorating them. The idea was to have two colors, orange and purple, for the cupcakes. These seem to be predominate Halloween colors when we were looking at Halloween decorating ideas. I purchased white fondant and colored it myself. This sounds like it's going to be much more complicated than it really was. The toughest part? The actual mixing of the color into the fondant. The fondant I purchased was in two-and-a-half pound blocks. I worked about a quarter of a block at a time. It has the consistency of clay so working in the coloring was a lot of folding and stretching and recombining until the color was uniform. I alternated between doing orange and doing purple and I didn't really have any issues being consistent in the coloring. All the orange looked the same and all the purple looked the same. I would roll a little out, cut out the circles, and pass them to Lorrie. She secured them to the cupcakes by first brushing the cupcakes with a light coat of corn syrup. Once dry, the corn syrup held the fondant firmly in place. Rolling out the fondant is much like rolling out dough for cutout cookies, you need a well-floured surface and rolling pin but in this case, that flour is actually powered sugar.
 Once all the cupcakes had the fondant layer, I gave them a dusting of pearl dust and then placed the candies. Pearl dust
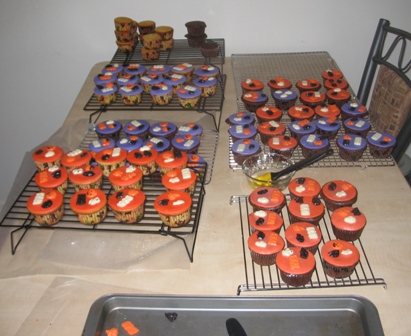
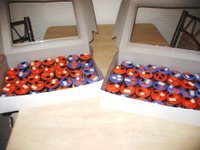 We had some baker's boxes to put them in and lined the bottoms with Halloween themed paper from the scrapbooking section of Michaels. The cupcake liners were Halloween themed until I blew past the seventy-two cupcake mark and then I used some plain ones that had a second aluminum cup (they are actually meant to be baked without a muffin pan, you just put these on a cookie sheet). Lorrie and I each took a box to work the Monday before Halloween.
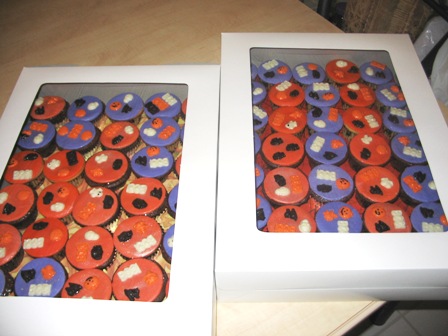 End result? They looked good and tasted even better. The fondant tasted better the next day. I have to admit I thought it was a little chewing gumish when I first tried it plain but when I had a cupcake the next day it was good. The finished product reminded me a little of a Hostess cupcake in look and feel when I bit into one, but better tasting. I do think this would be a good way of doing a creme filled cupcake, sometime in the future.
2 comments:
I'm impressed...so professional looking!
Thank you very much. I spent a lot of time on these and with Lorrie's help they turned out great. We are very happy with the results...and so were our coworkers!
Post a Comment