Showing posts with label Just Baking. Show all posts

Thursday, December 13, 2007

Cashew Creme Pear Tart from My Sweet Vegan


This past week I had the pleasure of going through one of the first copies of Hannah Kaminsky's new cookbook My Sweet Vegan and it really is impressive. I knew there would be great recipes in it but what surprised me was how complete of a cookbook it is. This book not only had a large number of different recipes but it is a good information source for cooking vegan (and allergy-free, gluten-free, etc.), especially for someone new to vegan cooking such as myself.

My Sweet Vegan starts with a brief introduction into Hannah's journey into vegan baking and then an overview of some of the special ingredients and tools she uses. I found the ingredient guide helpful because some of the recipes called for ingredients I'd never used or purchased before. It also helped me look at the ingredients from a vegan's perspective. Case in point, margarine. I thought margarine was non-dairy. Not true, brands like Imperial and Land O Lakes contain whey and buttermilk respectively. I only looked based on Hannah's advice.

My Sweet Vegan is broken into five chapters: Sweet Starts, Cookies and Bars, Cakes and Cupcakes, Pies and Tarts, and Miscellaneous Morsals and Desserts. The majority of recipes fall into the Cookies and Bars and Cakes and Cupcakes chapters. Each recipe has a little caption where Hannah talks about the item in the recipe and a large, full-color photo. As far as cookbooks go, I'm more likely to pick a new recipe if there is a picture because either the picture will appeal to me or the picture gives me an idea of how the recipe should turn out. I was also impressed by the large variety of recipes. Some books give you a chapter on something like pies and then give you basically the same pie with different fillings. The recipes presented by My Sweet Vegan varied quite a bit. Old standards like banana nut muffins, black & white cookies, Whoopie pies, and pumpkin pecan pie share the pages with pink lemonade tartlets, root beer float cupcakes, graham flour fig scones, and green tea tiramisu.

My Sweet Vegan ends with a food allergy index and an ingredient index. The food allergy index is a brilliant idea, making it very easy choose a recipe for my food allergy challenged friends without having to go through the ingredients list of each recipe.

The first recipe I tried was the Cashew Creme Pear Tart, which I selected mainly because of the picture. I was able to find almost all of the ingredients in my local supermarket, which isn't very fancy and definitely not the source for hard to find items. The only thing I couldn't find there was the brown rice syrup, hence the use of corn syrup as a substitute. I also made 6 (should have been 7) small tarts out of this recipe instead of one big one. As you can see below, the instructions were straightforward and simple to follow and this tart was a breeze to make, especially if you use the cashew butter like I did. I really like how the pear and the cashew creme tasted together and the crust was very similar to a sugar cookie. This definitely would be a good sweet ending to any meal.

Overall, I really like My Sweet Vegan and even though I'm not vegan, I can see making recipes out of this book for a long time to come.

Thursday, September 06, 2007

August 2007 Just Baking Round-Up

My "Look, I post somewhere else" round-up of posts I did as editor at Just Baking in August.

August 10 - Video Learning: Checkerboard Cookies - A great video demonstration of making a decorative sugar cookie without frosting.

August 13 - Bob’s Red Mill Cooking Classes - A list of classes available from Bob's Red Mill

August 15 - Triticale - One of my unusual ingredient posts.

No posts on August 1st, 7th, and 14th. I think September will be much better. Either way, Just Baking is growing every month.

*Update* - As Just Baking no longer exists, I have removed the actual links but left the post names as a source for ideas

Sunday, August 05, 2007

July 2007 Just Baking Round-Up

My "Look, I post somewhere else" round-up of posts I did as editor at Just Baking in July. Things are looking good over there. We are adding new writers and content and our stats have been increasing each month.

July 10 - Campfire Baking - My brief overview on Dutch ovens. Inspired by the attempt to use one while on vacation.

July 12 - Video Learning: Decorating Sugar Cookies - A cool video on decorating sugar cookies. It was cool to see her use a pasta maker to roll the fondant.

July 19 - Share Our Strength’s Great American Bake Sale® - I also posted the Share Our Strength's Great American Bake Sale on Just Baking.

July 20 - - Do you have the perfect casserole for any occasion? - Do you want to write for Just Baking.

July 25 - Video Learning: Mooncakes - Cool baked treats for the Chinese Mid-Autumn Festival.

No posts on July 3rd, 6th, 26th. I try to cover when the other writers don't post but sometimes I'm just too busy (stupid job!).

*Update* - As Just Baking no longer exists, I have removed the actual links but left the post names as a source for ideas

Wednesday, July 18, 2007

June 2007 Just Baking Update

My "Look, I post somewhere else" round-up of posts I did as editor at Just Baking in June.

June 4 - In The News - Couple of quick hit news posts from the world of baking.

June 12 - Just Baking, All Baking - An announcement about Just Baking and it's focus on all baking, not just sweets.

June 21 - Pistachio and Strawberry Stuffed French Toast - I've made this a number times now, it's very good.

June 25 - Video Learning: How to braid bread - Let's learn how to braid bread dough!

No posts on June 1 and June 22, not good. I try to cover when the other writers don't post but sometimes I'm just too busy (stupid job!).


*Update* - As Just Baking no longer exists, I have removed the actual links but left the post names as a source for ideas

Saturday, June 23, 2007

Pistachio and Strawberry Stuffed French Toast

My favorite meal of the day has to be breakfast. More times than not I'm having something for lunch or dinner that most people would consider breakfast. 'Breakfast served all day' is my 'cellar door'. Eggs, bacon, pancakes, waffles, omelets, what-have-you are the meals I cook most during the week. A real treat though, is French toast.

For Father's Day I was able to make this breakfast for my parents. I had made it a couple of weeks earlier and my girlfriend and I loved it. I believe the key is thick bread and a good, long soak in a custard-like mixture of eggs and cream. I see these recipes calling for 4 or 5 eggs and equal amounts of milk, just enough to cover several slices of sandwich bread. Make those recipes and you're missing out on how truly wonderful French toast is meant to be!

Pistachio and Strawberry Stuffed French Toast

Makes about 5-6 servings

1 loaf bread, sliced in 1" slices - I have used challah (slightly staled) and 'Italian peasant', both worked well
12 eggs
1 1/2 cups heavy cream
1 Tbls. vanilla
1 1/2 cups strawberries
sprinkles of cinnamon
sprinkles of nutmeg
1 1/4 cups pistachios

Beat the eggs and then add the heavy cream and vanilla and mix well. Slice the bread into 1 inch slices. If the egg mixture isn't in a dish big enough to soak several slices of bread, move it to a dish that can. Soak the bread in the egg mixture for 5 to 10 minutes, flipping the bread halfway through. Dice the strawberries while the bread is soaking. Place a layer of bread slices in a 9" by 13" greased pan. Use a spoon to press down on the bread and form a little indentation and then spoon the strawberries onto the bread. Place another layer of soaked bread on top, forming 'sandwiches'. Press down slightly on the tops slices to compress the 'sandwiches', just enough so there is no gap between the slices. Sprinkle lightly with nutmeg and then cinnamon. Crush the pistachios and place on the prepared french toast 'sandwiches' liberally. Bake in a preheated oven at 350° F for 40 to 45 minutes.

Serve with real maple syrup and butter.

Variations -

  • Use your favorite jams or other fruit for the filling.


  • This can be made into a savory dish by leaving out the cinnamon and nutmeg and using something like caramelized onions or spinach.


  • Try using cinnamon rolls instead of bread.


  • All pictures are from the morgueFile archive.

    Friday, June 15, 2007

    May 2007 Just Baking Update

    My "Look, I post somewhere else" round-up of posts I did as editor at Just Baking in May 2007.

    May 2 - Video Learning: How to Make a Wedding Cake - Shannon Pridgen, owner of Heavenly Crumbs Bakery in Brooklyn, NY, and Shelly Everett, owner of The Gourmet Angel Catering, show how to make a lemon wedding cake with buttercream frosting, start to finish.

    May 3 - King Arthur Flour Online Baking Classes - King Arthur Flour offers many baking classes.

    May 10 - Home Baking Association - A non-profit organization promoting home baking.

    May 15 - Video Learning: Puff Pastry - Let's learn how to make puff pastry!

    May 16 - Emmer and Einkorn - Ancient wheats.

    May 25 - Video Learning: Baking a Pie - I love my videos.

    OK, come to Just Baking. We have some incredible writers and it's shaping up to be our best month yet!


    *Update* - As Just Baking no longer exists, I have removed the actual links but left the post names as a source for ideas

    Tuesday, May 01, 2007

    April 2007 Just Baking Round-Up

    My "Look, I post somewhere else" round-up of posts I did as editor at Just Baking in April 2007.

    Apr. 11 - Yellow Cake - A Baking Basic - My Easter bunny cupcakes make an appearance.

    Apr. 13 - Blackberry Oat Muffins And A Lesson - I share my post about oats and how they aren't gluten free.

    Apr. 23 - Have you ever baked a birthday cake? (Or wanted to?) - We're looking for writers.

    Apr. 24 - Teff - Another unusual ingredient of the week.

    Apr. 25 - Video Learning: Baking Bread - I really like being able to put a video up.

    Apr. 30 - Congratulations - We're very proud of Hannah Kaminsky, a writer at Just Baking and her own site, Bittersweet, for her upcoming cookbook.

    *Update* - As Just Baking no longer exists, I have removed the actual links but left the post names as a source for ideas

    Tuesday, April 03, 2007

    March 2007 Just Baking Round-Up

    My "Look, I post somewhere else" round-up of posts I did as editor at Just Baking in March.

    Mar. 2 - A Good Breakfast - Repackaged version of my Northwoods Bran Muffin post for a new audience.

    Mar. 6 - Quinoa - Brief overview of Quinoa and its uses.

    Mar. 14 - Something Different - Date bars. Hmmm, sounds familiar.

    Mar. 15 - Help for the Beginning Baker (and Cook) - It's just amazing on what you can get free at Cook's Illustrated Online.

    Mar. 28 - In The News - The latest buzz - pizza can be healthy.

    Mar. 29 - Baking is Learning - I express my surprise at how well this recipe worked.

    Mar. 30 - A Phenomenon Reexamined - The news about how to make healthier pizza made me think of another news event.

    I had a very busy month.


    *Update* - As Just Baking no longer exists, I have removed the actual links but left the post names as a source for ideas

    Tuesday, March 13, 2007

    Blackberry Oat Muffins

    A couple of weeks ago, the question was posed to Lorrie on what she would do if she couldn't have wheat and would have to lead a gluten-free lifestyle. She loves bread and pasta and she thought it definitely would be very tough. I don't think she was aware of all the resources available online with recommendations and recipes for gluten-free food. So my next trip to the store, I picked up some gluten-free flours. Oat flour was among them. Now I was thinking that since oats aren't wheat, that means gluten-free. I went ahead and made these muffins, thinking I was making something without gluten. Later, after talking to Lorrie about bringing some in for a coworker with Celiac Disease, I double-checked the recipe and the ingredients to be sure. I was using Bob's Red Mill oat flour and when I examined the package, I couldn't find the gluten-free blurb. I thought this was odd and went to the website and found they did not consider it to be gluten-free. Apparently Bob's has a whole facility devoted to gluten-free products and oats are not processed there so their oats are processed in the same facility as wheat, thus contaminating them. I learned something new.

    These muffins came out great. Slightly dense and moist, the flavor was wonderful. The blackberry and oat flavors complimented each other well. I had mentioned to Lorrie that she can take them to work and she told me no, we would be keeping these to ourselves. We did and I don't feel bad about that at all.


    Blackberry Oat Muffins

    Makes about 12-14 muffins

    3 1/2 cups oat flour
    1 cup instant oats
    1 Tbls. baking powder
    1 1/2 tsp. cinnamon
    1/2 tsp. salt
    1 cup sugar
    1/2 cup vegetable oil
    1 cup whole milk
    2 large eggs
    1 cup roughly chopped blackberries

    Preheat the oven to 425° F.

    Combine the eggs, oil, and milk in a bowl, mix well, and set aside.

    In a large bowl, combine the dry ingredients (all the remaining ingredients except the blackberries) and whisk to combine. Now add in the blackberries and give a quick stir to cover with the flour mixture. Finally, add the wet ingredients to the flour mixture and stir until everything is just mixed. Don't over mix.

    Spoon the mixture into greased or paper-lined muffin cups. Fill each to the top and mound slightly in the center if possible.

    Bake for 16-20 minutes. About halfway through, rotate the pan 180°. The muffins are done when a cake tester comes out clean and they spring back when pressed lightly. Remove from the oven, let cool in the pan for about 5 minutes, then transfer to a wire rack to cool.


    These muffins were submitted to Sweetnick's for her ARF/5-A-Day Tuesday feature. This is also now a post at Just Baking as well.

    Thursday, March 01, 2007

    February 2007 Just Baking Round-Up

    Just highlighting some of the posts I did as editor at Just Baking in February (and one from January) that didn't appear here.

    Jan. 31 - Amaranth Flour - Brief overview of Amaranth flour and its uses.

    Feb. 6 - In The News - Baking in the news round-up. Layer cakes, madeleines, personal achievement, baking competition, and Ace Of Cakes.

    Feb. 7 - A note from the editor - Introducing myself and direction of Just Baking.

    Feb. 12 - Welcome to Valentine’s Week - All the Well Fed Network sites ran posts with Valentine's Day themes.

    Feb. 16 - A Tip For Your Heart - Tip on how to make a heart cake without a heart pan.


    *Update* - As Just Baking no longer exists, I have removed the actual links but left the post names as a source for ideas

    Thursday, February 08, 2007

    Whole Wheat Pizza Crust

    A common dinner for Lorrie and myself is a couple of individual pizzas. I'll get a package of flatbreads from the store and a couple of toppings to put on them. Flatbreads on the pan, toppings on the flatbread, oven, bake, pizza. Pretty simple but tastes great. The past couple of weekends I've been creating my own flatbreads for the pizzas. The recipe I'm using is based on a whole wheat pizza recipe in the King Arthur Flour Whole Grain Baking cookbook. Honestly, I could tell you I researched the recipes and chose this one because of so-and-so reason but really I chose the recipe because it didn't use pre-ferments or need to sit overnight. The usual ingredients for our pizzas are garlic, olive oil, spinach (wilted in a hot pan first), sliced tomato, and provolone cheese.


    Whole Wheat Pizza Crust
    based on the Herbed Whole Wheat Pizza with Mushrooms and Spinach on page 134-136 of the King Arthur Flour Whole Grain Baking: Delicious Recipes Using Nutritious Whole Grains cookbook.

    Makes 2 12-inch rounds

    3 3/4 cups (15 oz.) white whole wheat flour (I used the King Arthur Organic Whole Wheat)
    1 Tbls. + 1 1/2 tsp. instant yeast
    1 1/2 cups (12 oz) cool water
    1 Tbls. honey
    1 Tbls. olive oil
    2 tsp. salt
    1 Tbls. dried oregano
    1 Tbls. dried basil
    1/2 tsp. cayenne pepper

    In a medium bowl put 2 cups of the flour and all of the yeast. Measure out the water and add to that the honey and stir until it's combined. Add the water-honey mixture to the flour and yeast and mix thoroughly. Cover the bowl with plastic wrap and let sit for an hour.

    After the hour, remove the plastic wrap and add in the remaining ingredients and mix. Remove the dough from the bowl and knead on a lightly floured surface for 5 minutes or so. Stop kneading when the dough is shiny and elastic yet soft. Have a baker's bench knife handy to help if the dough sticks because you don't want to over-flour this. Put the dough back into the bowl, cover, and let sit for another 90 minutes. After about 90 minutes the dough should have doubled in size.

    Once this second rise is done, turn the dough out onto the lightly floured surface. Divide the dough in half and form each half into a round. Cover these rounds and let them rest for another 20 minutes.

    Preheat the oven to 375° F (with a baking stone if that is what you use). Roll each round out to a 12-inch round and put on your pan, baking sheet, or parchment paper. Use a fork to prick the crust all over (if you look at the first picture you will see the dough puffed up; I missed this step the first time through). If you want a traditional end crust, roll up the edges. Bake the crusts individually for 10 minutes and remove from the oven.

    At this point you have 2 crusts for use. Use immediately or let cool completely and freeze. When you add your toppings and bake, bake the pizza at 425° F.

    Sunday, February 04, 2007

    Lemon Squares

    On nights when temperatures are below zero, it's hard not to let the mind wander and think about warmer times. When I do this, my thoughts drift towards the approaching spring season. My first round of golf for the year may only be a month a way, time to start hitting the driving ranges. Garden planning should begin now. It won't be totally pitch black when I leave work. While I like the colors and hues of winter, when I think of spring I start thinking of bright colors like yellow. This is the reason when I saw this recipe for lemon bars, I thought of spring.

    Lemon Bars
    from the Spring 2007 issue of The Baker's Companion magazine, page 47.

    Crust
    1 1/2 cups (6 1/4 oz.) unbleached all-purpose flour
    1/4 cup (1 oz.) powdered sugar
    1/4 tsp. salt
    1/2 cup (1 stick) butter

    Topping
    4 large eggs
    1 1/4 cups (8 3/4 oz.) granulated sugar
    1/2 cup (4 oz.) lemon juice
    1/4 cup (1 oz.) unbleached all-purpose flour
    1/2 tsp. salt
    2 Tbls. lemon zest (2 lemons worth) or 1/2 tsp. lemon oil
    powdered sugar for sprinkling

    While preheating the oven to 350° F, grease a 9x9 inch (or similarly dimensioned) pan.

    Make the crust first. In a medium-size bowl, combine the flour, sugar, and salt and mix thoroughly. Cut in the butter using your fingers or a pastry blender. Mix until the crumbs are coarse. Put the crumbs in the pan and press to form the crust. Bake this for 20 minutes. It's done when the color is a light brown.

    For the topping, cream the eggs, sugar (granulated), and lemon juice until it's smooth. Fold in the flour, lemon zest or oil, and salt. Pour this over the crust once it is finished with the pre-bake and bake for another 25 minutes. These bars are done when the topping appears set. Remove from the oven and let cool in the pan. Just before serving, sprinkle with powdered sugar.

    A tip for one of Lorrie's coworkers: Use a cookie cutter or a stencil to give the sprinkled powdered sugar a shape.

    Monday, January 29, 2007

    Changes over at Just Baking


    As of this past weekend, I have taken over editorial duties at Just Baking. I'm looking forward to the task ahead. That said, things shouldn't change much here or there. So c'mon by and check things out!

    Granola Grabbers

    I was looking for a cookie I could bake for a Super Bowl party. I wanted something that was hearty and could hold it's own with the various dips, hors d'œuvres, and brownies. These cookies are perfect. Filled with almonds, peanuts, coconut, and raisins, there's a little something for everyone here.

    These are also great as a midnight snack. The cookies are crunchy and chewy at the same time, a combination that just begs to be paired with milk.


    Granola Grabbers
    from page 82 of the Baking: From My Home to Yours by Dorie Greenspan

    Makes about 40 cookies

    3 cups granola (no fruit)
    3/4 cup raisins
    1/2 cup salted peanuts
    1/2 cup slivered almonds
    1/2 cups sweetened shredded coconut
    1/3 cup wheat germ
    1 3/4 sticks (14 Tbls.) unsalted butter at room temperature
    3/4 cup (packed) light brown sugar
    1/4 cup sugar
    1 large egg
    1/4 teaspoon salt
    1 cup all-purpose flour

    Preheat the oven to 375° F and prepare 2 baking sheets.

    Combine the granola, raisins, peanuts, almonds, coconut, and wheat germ in a bowl and mix well. Set aside for later.

    In a mixer beat the butter for 2 minutes at a medium speed. Add the brown sugar and the granulated sugar and cream for 3 minutes or so. Add the salt and the egg and mix thoroughly. Reduce the mixer speed to low. Add the flour and once it is just mixed, add the granola mixture. Stop the mixer once all the granola, nuts, and fruit are just combined. You do not want to over beat this batter. Use a spatula to incorporate any remaining dry ingredients.

    Take a heaping tablespoon of the dough and gently pack. Place each cookie about 1 1/2 inch from each other though these won't spread a lot. Flatten them down a tiny bit using your fingertips.

    Bake for 10-12 minutes. About halfway through, rotate the pans 180° and switch the pans on the racks. The cookies are done when they are a golden brown but not hard. Remove from the oven, let cool in the pan for a minute or two, then transfer to a wire rack to cool.


    Also appearing at Just Baking and featured on the Well Fed Network.

    Thursday, December 28, 2006

    Lebkuchen

    Lebkuchen is a form of gingerbread common in Germany. The difference between Lebkuchen and what we Americans typically think of gingerbread is it's made with honey instead of molasses, hence the lighter color. Lebkuchen was developed in the 13th century by Franconian monks though the development of the name Lebkuchen is still a mystery. The most likely explanation is it comes from the Latin word for a flat, unleavened loaf, libum. However the more popular (and less academic) belief is the name comes from the German word Leben, which means life. In fact, it is believed that eating these "life cakes" can chase away the winter blues.

    The city most famous for its Lebkuchen is Nuremberg. Located on a major spice route, records show Lebkuchen was baked in Nuremberg since the late 14th century. Nuremberg Lebkuchen is a protected food product in Europe and its production is strictly controlled. The highest quality Lebkuchen of Nuremberg is given the title Elisen, supposedly named after a daughter of a Nuremberg baker.

    This particular recipe uses crystallized ginger instead of the more common candied fruit. This change causes the spicy flavor of ginger to be strong in these bars. The bars themselves are dense but soft. The bars do rise slightly while baking but they will basically be the thickness you roll them out to be. If you try to roll them out thin like a sugar cookie I believe you would get a hard, dense cookie that might be tough to chew. The dough is sticky, very sticky. It was probably the toughest cookie/bar/etc. dough I've worked with yet. And there is the time factor. The dough must chill overnight in this recipe (and many others). I recommend that when chilling the dough, gently work it into a ball shape so only a small portion of the dough touches the bowl. It will be much, much easier to remove from the bowl the next day. Still, the rewards of this delicious bar outweighed the work involved.


    Lebkuchen
    from page 198 of the The King Arthur Flour Cookie Companion: The Essential Cookie Cookbook

    Makes about 24 bars

    3/4 cup (9 oz) honey
    1/2 cup (4 oz) light brown sugar
    1 large egg
    2 tsp chopped lemon zest or 1/4 tsp lemon oil
    2 tsp chopped orange zest or 1/4 tsp orange oil
    2 1/4 cups (9 1/2 oz) unbleached all-purpose flour
    1/4 tsp baking soda
    1/2 cups (2 oz) finely chopped blanched almonds
    2 tsp cinnamon
    1 tsp ground ginger
    1 tsp ground nutmeg
    1 tsp ground cloves
    3 rounded Tbls (1 3/4 oz) diced crystallized ginger
    6 Tbls brandy
    1 cup (4 oz) powdered sugar

    Combine the honey and the brown sugar in a saucepan and bring to a boil while stirring occasionally. Once boiling, remove from heat and let it cool until it's only slightly warm. Using a food processor, chop the crystallized ginger until it is fine. Mix the honey-brown sugar mixture, egg, lemon zest or oil, and orange zest or oil in a large bowl until they are well mixed. Add in the spices, flour, crystallized ginger, baking soda, and almonds and mix until they are thoroughly mixed. This produces a stiff and very sticky dough. Very sticky. Cover the bowl, put in the refrigerator, and let sit overnight.

    When you are ready the next day, preheat the oven to 350° F and grease a 9x13 inch or equivalent sized pan. Remove the dough from the refrigerator and place on a lightly floured surface. Roll out the dough to fit into the pan. The dough will be very sticky but try not to over-flour everything. Put the dough in the pan. I rolled it onto the rolling pin and then unrolled it in the pan. Fit the dough into the pan the best you can but don't press down too hard. I greased my fingers and that worked pretty well. Bake for about 20 to 22 minutes. In the meantime, mix the brandy and the powdered sugar. This glaze isn't very thick. The bars are down when a cake tester or toothpick comes out clean. Transfer to a cooling rack immediately and begin glazing. Apply the glaze in layers so each layer has time to soak in and harden. Once fully glazed and cooled, cut into 1x2 inch bars. If you store these in an airtight container with a slice of apple, they will stay soft.


    Also on Just Baking.

    Sources:
    Lebkuchen at Wikipedia
    German Embassy in Washington DC
    Nuremberg Gingerbread Tour
    The King Arthur Flour Cookie Companion: The Essential Cookie Cookbook
    Germany's Regional Recipes
    German Cookery: The Crown Classic Cookbook Series (Crown Classic Cookbook)
    The German Cookbook: A Complete Guide to Mastering Authentic German Cooking

    Tuesday, December 05, 2006

    My first post at Just Baking

    Stollen is a traditional German fruitcake made to celebrate the Christmas season. Although many recipes exist, the most famous is the Dresden Stollen ("Dresdner Weihnachtsstollen" in German). The city of Dresden is also where Stollen was first created in the 15th century and sold at the Striezelmarkt Christmas market. Originally called Striezel, the once folded over shape of the Stollen was meant to represent the baby Jesus in swaddling clothes. Later miners renamed it because they thought it looked like the opening to a mine or Stollen.

    Continue reading at Just Baking...


    Sources for Stollen:
    Interesting fact I couldn't fit into the article: Martin Luther refers to "butter-letters" in his writings at the start of the Protestant Reformation so the desire to improve the taste of Stollen actually had a tiny part in the Saxony's change from Catholicism to Protestantism.

    Stollen

    Stollen is a traditional German fruitcake made to celebrate the Christmas season. Although many recipes exist, the most famous is the Dresden Stollen (”Dresdner Weihnachtsstollen” in German). The city of Dresden is also where Stollen was first created in the 15th century and sold at the Striezelmarkt Christmas market. Originally called Striezel, the once folded over shape of the Stollen was meant to represent the baby Jesus in swaddling clothes. Later miners renamed it because they thought it looked like the opening to a mine or Stollen.

    The original recipe for Stollen contained no dairy products. Historically, the Advent season was a time for fasting and things like milk and butter were not allowed. So the original Stollen was hard and relatively tasteless. In 1674 Prince Elector Ernst and his brother Duke Albrecht petitioned the Pope to allow their bakers to use butter. The Pope granted them a “butter-letter” which allowed only them the use of dairy during the fasting period. A few years later other bakers were also allowed to use butter but they had to pay a fine. The fines for using butter stopped when Saxony became Protestant.

    Every year in Dresden they hold the Dresden Stollen Festival. It occurs on the Saturday before the 2nd Sunday of Advent, which is December 9th this year. Over 700,000 people take part in a day which includes a parade and the ceremonial cutting of the 3 to 4 ton giant Stollen by the Royal Master Baker and the Stollen Maiden. Pieces of the giant Stollen are sold to guests with part of the money generated going to charity.

    The recipe below is from Mimi Sheraton’s wonderful cookbook The German Cookbook: A Complete Guide to Mastering Authentic German Cooking. It is on pages 450-451 and is bookended by two other recipes for Christmas breads. While researching the history of Stollen, I also found this was the recipe promoted by the German Embassy in Canada.

    Stollen

    Makes 3 loaves

    1-1/2 cups raisins
    1 cup chopped citron
    1 cup chopped candied orange peel
    1/2 cup rum
    6 to 8 slivered blanched bitter almonds or 1 teaspoon almond extract
    2 envelopes dried powdered yeast
    1/2 cup luke-warm water
    1 tablespoon sugar (optional - used to activate the yeast quickly)
    2 cups milk
    1 cup sugar
    2 teaspoons salt
    1-1/3 cups butter
    1 lemon rind, grated
    2 tbs. rum
    2 cups flour
    4 eggs, lightly beaten
    5 to 7 cups flour
    1-1/2 cups chopped blanched almonds
    melted butter
    granulated sugar
    confectioner’s sugar (vanilla flavored is preferred)

    Soak the raisins, citron, and orange peel in rum for about an hour and then drain but save the rum. Follow the directions on the package to activate the yeast in warm water. Scald the milk and add the sugar, salt, and butter. After the butter has melted, add to the mixture the rum, lemon peel, and almond extract if you are not using bitter almonds. Let the mixture cool until it is lukewarm in temperature. Add the yeast mixture to this as well as 2 cups of flour. Mix thoroughly and let it sit in a warm area with no draft until the dough blisters (about 15-30 minutes). When the dough is ready, lightly beat the eggs and add them in. Slowly mix in the additional 5-7 cups of flour until the dough is not sticky, but soft and light and smooth enough to handle.

    Dry the soaked fruit and lightly dredge it with flour. Place the dough onto a thoroughly floured board to knead. While kneading, add in the fruit, almonds, and bitter almonds if you are not using the almond extract. Continue kneading until the dough is smooth and elastic and blisters. Form a ball and put in a floured bowl. Brush the dough with melted butter, cover with a thin towel, and place in a warm, draft-less area to rise for about an hour. The dough should double in bulk. Punch the dough down and divide into three smaller balls.

    Let the dough rest for 10 minutes and then roll each ball into an oval about 3/4 of an inch thick. Brush the tops with melted butter and sprinkle a small amount of sugar over them. Fold each oval in half length-ways so the edge of the top half doesn’t quite meet the edge of the bottom half. Place all three loaves on a buttered baking sheet and again brush with melted butter. Allow the loaves to rise in a draft-free, warm area until they double in bulk again (about 1 hour).

    Preheat your oven to 425° F. First bake the loaves for 10 minutes and then turn the heat down to 350° F. Bake the loaves for roughly 45 minutes. The loaves are done when they are golden brown. Remove from the oven and place on a cooling rack. While still warm, brush the loaves with melted butter and generously sprinkle the confectioner’s sugar over them. The confectioner’s sugar should cover the top of the loaves like an icing.

    Stollen is served in 1/4 inch to 1/2 inch slices and sprinkled with additional confectioner’s sugar. It does store well in a cool place (not in the refrigerator).

    As posted at Just Baking.

    The photo used was taken from the Flickr account of Rene Schwietzke and used under the Creative Commons Attribution 2.0 license.

    Thursday, November 16, 2006

    I enjoy doing this site

    Coming up with ideas for posts and then actually making them is a lot of fun. They say that when you do something you love it shows. I don't know who 'they' are but the sentiment is correct. Somebody did notice. The good people over at the Well Fed Network noticed and offered me a chance to be a contributor on two of their sites: Just Baking and Sugar Savvy. The Well Fed Network is a collection of fifteen food and wine orientated sites dedicated to bringing you high quality articles and ideas you can use.

    I will let the sites describe themselves:
    Just Baking - Fresh from the oven, we'll be talking about cookies, cakes and breads, and we won’t stop there.
    Sugar Savvy - Fabulous content on chocolate, the latest candy bars, gum flavors and much more in the world of sweets.

    So come on by, check them out. I should have my first posts up in a short while. I've added links to those sites in the "Sites that inspire me" section on the right side of your screen.

    Tuesday, November 14, 2006

    Northwoods Bran Muffins

    On a typical day my breakfast is a muffin from the cafeteria at work. Nothing too fancy, a bran muffin, maybe a cranberry one. This past Sunday I was paging through my King Arthur Flour Baker's Companioncookbook, looking to see if was anything a little healthier to make when I stumbled on a recipe for raisin bran muffins. This sounded pretty good to me so I made a shopping list and went about my business. Later when I was getting ready to make the muffins I mentioned to Lorrie what I was making and she suggested cranberries instead of raisins (she hates them). I had already planned to modify the recipe so this wasn't a big deal. We called these Northwoods bran muffins because maple syrup and cranberries are two things that the northwoods of Wisconsin are known for.

    This post is part of Cate's ARF/5-A-Day Tuesday round-up of recipes that use antioxident rich foods at Sweetnicks.

    Northwoods Bran Muffins
    based on the Raisin Bran Muffins recipe on page 72 of the The King Arthur Flour Baker's Companion: The All-Purpose Baking Cookbook

    Makes 12 regular sized muffins

    1 cup milk (I used whole)
    1/3 cup (2 3/8 oz) vegetable oil
    2 large eggs
    3/4 cup maple syrup (from Wisconsin actually)
    3/4 cup (1 1/2 oz) wheat bran
    1/2 cup (1 3/4 oz) old-fashioned rolled oats
    1 1/2 teaspoons cinnamon
    1/2 teaspoon salt (I used earth salts)
    1 1/4 cups (6 1/2 oz) + 1 tablespoon whole wheat flour (I used 100% organic)
    1 teaspoon baking powder
    1/2 cup (3 oz) dried cranberries

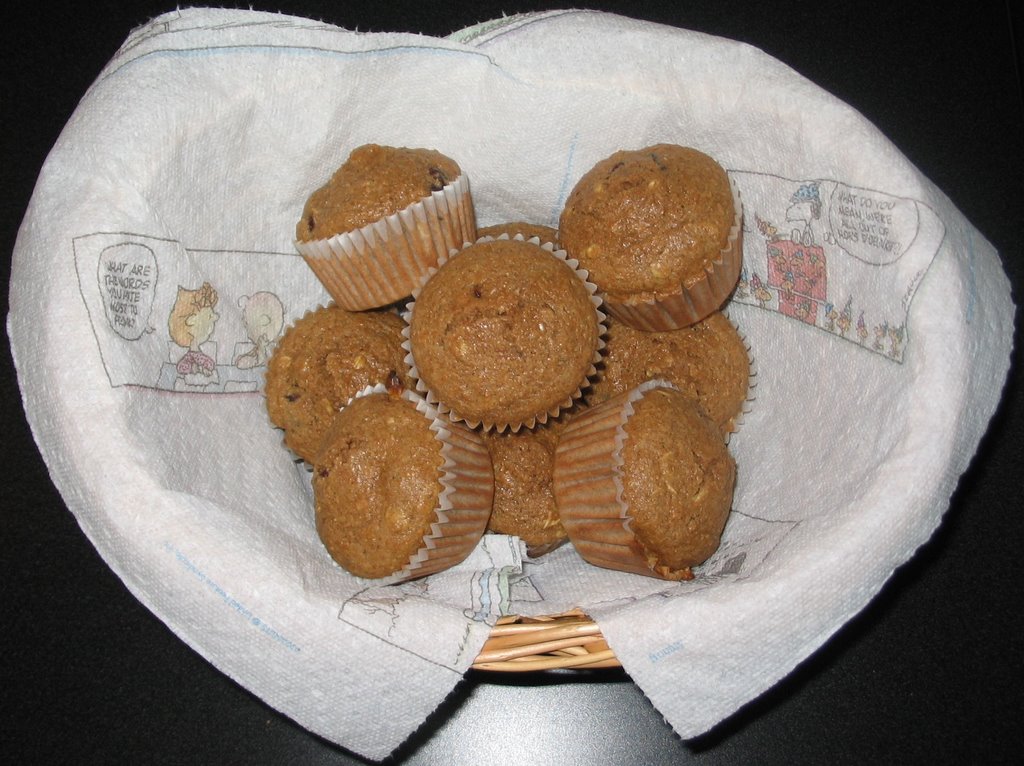
    Preheat the oven at 425 degrees Fahrenheit. Combine the milk, oil, eggs, and maple syrup. Add the wheat bran and oats and set aside for about 15 minutes. In another bowl combine the flour, salt, cinnamon, and baking powder; whisk thoroughly. If needed, give the cranberries a rough chop so they are about the same size as raisins. Fold the dry ingredients and the cranberries into the soaking bran and oat mixture. Dish out into muffin cups and bake for about 15 minutes. These are done when a cake tester comes out cleanly.

    I like these muffins but I wasn't prepared for the taste when I first tried them. I had the sugary, cakey muffins they sell at work in my mind and these are definitely not that type of muffin. It was the whole wheat taste that threw me. Also these are not sugary. If you want sweeter it would probably be safe to put another 1/4 cup of maple syrup and/or another 1/4 cup or so of cranberries without having to adjust the flour in the recipe. Lorrie brought these to work and a coworker (who was unable to have some of the other sugar-laden creations I sent in for dietary reasons) enjoyed these immensely.

    I am also very happy to be sharing my first recipe.


    These muffins also appeared at Just Baking.