Showing posts with label Sugar Savvy. Show all posts

Thursday, June 28, 2007

Strawberry Syrup

As a child growing up, I enjoyed reading The Little House On The Prairie books. I was amazed at what they did to survive. A child of the Seventies, all I knew were supermarkets. Sure, my parents and grandparents told me stories about how it was when they were growing up but stories about the someone getting the first car or TV in the neighborhood didn’t compare to the seemingly outlandish concept of having to hunt and grow everything you were going to eat for the next year. My young mind fell in love with the concept of being able to make my own maple syrup. We had maple trees in the front yard, we could do it too, right? Luckily my parents put a quick end to that concept before the maple trees in our yard and the red maple trees in the other yards were harmed. But I still had the dream.
When I grew up, I’m going to have lots of land with lots of maple trees and I’m going to make my syrup! Alas, that dream has yet to come to fruition. I live in an exurb of Chicago, surrounded by strip malls and townhomes. Yeah, there is a maple tree in one of the common areas but I think if I stuck a tap in it and hung a bucket, it would probably end up bent over like Charlie Brown’s Christmas tree. Come to think of it, there’s probably something in the bylaws of homeowners association against it too.
However, despite the lack of maple trees and an angry homeowners association, I can still make my own syrup. The farmer’s market season started here about two weeks ago and there is a great selection of fruit. Containers of cherries and blueberries were at most of the stands and this week strawberries started making an appearance. Besides being just plain good to eat, they work well in jellies and jams, but they also make very good syrups.

Strawberry Syrup
Yields about 3 cups

1 1/2 cups chopped strawberries
1 Tbls. lemon juice
1/4 cup sugar
1 1/2 cups light corn syrup
1/4 cup cornstarch
2 Tbls. cold water

In a 2-quart saucepan combine the strawberries, lemon juice, sugar, and corn syrup and bring to a simmer over medium heat. As this mixture heats up, mix the water and the cornstarch and stir until the cornstarch dissolves. Once the syrup simmers, add the cornstarch slurry. Continuously stir until the syrup starts simmering again and goes from cloudy to clear. If the berries are not broken down enough, use an immersion blender or run through a fine-mesh strainer before serving. Serve warm.

- Other berries like blackberries and raspberries work as well. Strain for seeds before serving.
- Rhubarb adds a nice touch as well. Use 3/4 cup rhubarb and 3/4 cup strawberries. Start the syrup using the rhubarb first and then add the strawberries once the rhubarb is tender.


All pictures are from the morgueFile archive.


Also appearing at Sugar Savvy and featured on the Well Fed Network.

Thursday, May 31, 2007

I want candy (for other reasons)

I have to admit, I feel a little out of place at Sugar Savvy. I mean, I like candy. Yeah, my Halloween candy lasted until Easter and my Easter candy lasted until Halloween, but really, I like candy. It seems to me to be review, review, Hey - I made brittle, review, review. And by no means am I trying to demean what they are doing. I know they enjoy eating and writing about sweets as much as I do, they’re probably even better at the writing part of it too. But in my little world, I just have a different view of candy. When I see a piece of candy, my first thought isn’t so much about taste, but can I use this in something. To me, more often than not, I think of candy as a part of a larger piece.

Take these marshmallow ice cream cones for example.


When I saw these I wasn’t thinking about a slightly stale marshmallow taste with a sugar crust reminiscent of Peeps. I was trying to figure the best way to work them into a home-baked gift, which turned into this:


One of my favorite things to use is chocolate.  I've used molded chocolate (and it’s cheaper and easier-to-use cousin candy melts) for a number of projects. It’s so simple to do. Cars, bats, skulls, and hearts are just some of the things I've made to adorn or accompany my baked goods. First, you need a mold. I was lucky starting out, there was a baking and candy making supply store near me with large selection of chocolate molds. Sadly, well for me anyway, it closed recently. Hobby stores and party supply stores also have molds; however they tend to have a small selection of just the basics. With a little planning though, you can find anything you need online. The next step is to melt the chocolate. Then pour into the mold. Scrap off the excess, refrigerate until hard, and unmold. You now have your own crafted candies.


Marshmallow cone picture from the Marshmallow Cone Company Website


Also appearing at Sugar Savvy and featured on the Well Fed Network.


Follow-Up
I received this email a couple days ago:

I just happened to come across your blog today when I was doing a search for “marshmallow cones.”

Not that it’s here or there, but under your May 31st entry, you show a picture of our marshmallow cones and then your cupcakes have a tiny marshmallow cone on them.

The first picture is from our website (I took and edited it myself), the latter one is a foreign-made “marshmallow” cone.

There’s a big difference between our product and theirs – ours is 4” long, theirs is 1.5 or 2” long. Ours has a marshmallow topping, theirs is more like a sugar-crusted jelly bean.

FWIW, given your penchant for cooking/baking/decorating you might be interested in knowing that some people use our cones in building gingerbread houses. One woman sent me pictures where they had used the cones as front door pillars.

Anyway, I saw your blog and just thought I’d write.

Take care,
Dan

Dan Runk
President
Marshmallow Cone Company
www.marshmallowcone.com
"Celebrating 71 Years (1936-2007)"


I have to admit I wasn't entirely sure the cones I used were his brand. Lorrie purchased them from a candy store chain and I tried to find the source the best I could since there was no box. I tried to match up the look and style of the cones to pictures on the 'Net and I thought I had. Obviously, this is not the case and I apologize for any inconvenience this may have caused.

Wednesday, March 28, 2007

Peanut Brittle

I've been waiting for a chance to try this recipe from Kate Zuckerman's book The Sweet Life: Desserts from Chanterelle, and a "Food Day" at work tomorrow is the perfect excuse. I like this book a lot; it's well written and contains a ton of information and tips. She shares the pastry chef perspective and that adds so much to a recipe that a novice like myself can understand more than just ingredients and cooking times but also methodology, presentation, and repeatability.

This recipe is a perfect example. Just about every peanut brittle recipe I've seen is basically boiling the sugar, adding the nuts, cooling in a pan, and then breaking into pieces. No frills. The steps Kate lays out allow for variation at certain places while still maintaining your ability to recreate a well-finished piece. Cooling the caramel and grinding it allows you to change nuts within the same batch. Want to do some almond and some peanut? No problem. Another benefit of grinding? It gives you more control over what the final product will look like so you can make circles or tubes instead of broken glass-like pieces. That's just a great way to impress your friends.

Following this recipe made me feel more like a "chef" than a cook, if I may be so bold so obviously I can't recommend this book enough.


Thin and Delicate Peanut Brittle
from page 204 of the The Sweet Life: Desserts from Chanterelleby Kate Zuckerman

1 cup sugar
1/3 cup water
1/8 tsp. cream of tartar
1/2 cup ground peanuts
1/4 tsp. finely ground sea salt

Preheat the oven to 350° F and prepare a 11"x17" baking pan with parchment, nonstick baking pad, or aluminum foil.

In a small, heavy-bottomed pan combine the water, sugar, and cream of tartar and heat over high heat. When the mixture begins a rolling boil, reduce the heat to about medium-high. Once the color changes to a golden brown caramel color, remove from the heat and pour into the prepared pan to cool.

Once the caramel has cooled, break it up into small pieces. Use a food processor or coffee grinder to grind the caramel into a fine table sugarlike consistency. Combine this with the ground peanuts.

Prepare your baking pan again. Pour this mixture into the prepared pan and spread very thin (1/8 inch thick). Bake the candy for about 4-6 minutes, until it melts and bubbles. Remove from the oven and evenly sprinkle the salt over the candy. Let cool and break into pieces to serve.

This will keep for up to 2 weeks in a sealed container in a cool, dry place. Humidity will rob this brittle of its crunch.

Tuesday, January 30, 2007

Almond Honey Caramel Chews

These candies might just be the best thing to ever come out of my kitchen. Better than the sugar almonds. Better than any cookie I've ever made. Heck, better than anything to come off of my grill.

The flavor and texture is incredible. A little crunchy when you first bite into them that dissolves into a wonderful caramel and almond chewy candy with a hint of honey. These are perfect for a party, be it a Super Bowl party or just having friends over.

These are not hard to make, they just take time. The cooking process is slow so there is no worrying about the candy heating or cooling too fast.

Almond Honey Caramel Chews
from page 193 of the The Sweet Life: Desserts from Chanterelleby Kate Zuckerman

Makes about 50 candy pieces

14 oz. (about 4 cups) sliced, blanched almonds
1 cup heavy cream
1 cup whole milk
2 sticks (16 Tbls.) butter
3/4 cup honey
1 1/2 cup sugar
1 Tbls. light corn syrup

Preheat the oven to 350° F. Place the almonds on a baking sheet and bake for 10-15 minutes. They are done when their color is brown and there is a noticeable nutty smell. Take out of the oven and place in a bowl.

Prepare a 12x8 inch pan (or a pan with a similar area) by greasing the pan and placing parchment or aluminum foil on the bottom.

In a heavy bottomed pan with a candy thermometer attached, combine all the ingredients but the almonds and heat over medium-high heat. Make sure the pan can hold four or five times the initial ingredients. I used a 4 qt. pan and it nearly overflowed when it reached the boiling point. Bring the mixture to a boil. Once the color changes to a light golden brown, reduce the heat to medium-low. Continue cooking until the temperature reaches 260° F, stirring about every two minutes. Once it reaches 260° F, remove the pan from the heat.

Fold in the almonds. Pour this mixture into the prepared pan. Bake the candy for 10-12 minutes. It is done when air bubbles appear all over the candy. Remove from the oven and let cool in the pan for at least 4 hours.

Carefully cut the cooled candy into desired shapes.


Also appearing at Sugar Savvy.

A real treat, Kate Zuckerman found my site and left suggestions for variations of these candies! Check out her comment in the comment section and her wonderful site PastryChat. She mentions my attempt at her recipe here. Very cool!

Wednesday, December 06, 2006

Sugar Almonds

While doing research for an article about Stollen for Just Baking, I ran across a recipe for sugar almonds that piqued my curiosity. I was intrigued by the simple list of ingredients and the method used to create a hard candy shell, so I gave it a try. The results were surprisingly excellent. The candy coating gave the almonds a good crunch when you bit into them. The flavors of the sugar, cinnamon, and almonds were well balanced. No flavor overpowered another. The small amount of cinnamon was noticeable and highlighted the sweetness of the sugar. These almonds would be popular served at a party or on a dessert tray. They would also make a wonderful gift from your kitchen, in a decorated jar or container.

The key to the recipe is not overcooking the almonds, a lesson I learned the hard way. While preparing a batch I was paged for work and ended up overcooking the almonds because of the distraction. Although the shell still formed and had the desired crunchiness, the flavor and texture of slightly burnt almonds made them unpleasant to eat. I also made batches in different size pans (two and four quart) and found that the bigger pan made it easier to keep the almonds separate at the end.

The recipe is from German Cookery: The Crown Classic Cookbook Series (Crown Classic Cookbook). It’s recipe number 494 (page 199), which is in the candies section of the chapter entitled “Christmas Cakes and Candies”.

Sugar Almonds
4 Tbls. water
3/4 cup granulated sugar
3/4 cup shelled almonds (do not use blanched)
1/4 tsp. cinnamon

Grease a jelly roll or similar pan and place two forks by it. Combine water and sugar in a heavy bottomed sauce pan and heat until this forms a thick syrup. The water will boil off. When the syrup is ready, remove it from heat, gently add in the almonds, and stir constantly. Continue to stir until the sugar syrup begins to crackle, which does not take long and occurs while the syrup is still liquid. Place this over heat again. The sugar will crystallize and form a white grainy coating; continue heating and stirring until all the sugar is melted again. Once all the sugar is melted, mix in the cinnamon. Remove from heat and pour onto greased pan. Separate the almonds with the forks, working quickly before they cool and fuse together.


As posted at Sugar Savvy or as one of the featured articles at Well Fed...

Sources for Sugar Almonds:

Monday, November 20, 2006

Peppermint Bark

Every year around this time the number of catalogs in my mailbox explodes. Catalogs for fruit, nuts, paper, teddy bears, flowers, you name it, they have a catalog and they will send it to you for free. I even received a catalog this year for English muffins. English muffins! After checking out all of the things they have to offer, I am always amazed at the prices of everything knowing that people order out of these catalogs all the time. If they didn’t, there wouldn’t be a catalog dedicated to English muffins. I understand that. But still many of the things they offer for $25-$30 plus shipping and handling are easy to make and giving something homemade instead of out of a catalog just makes the gift that much more special.

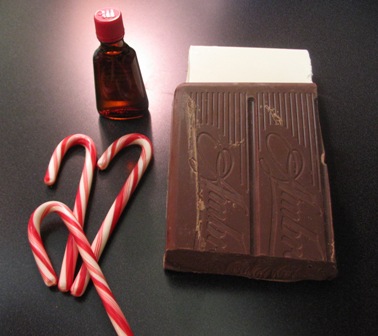
Peppermint bark is one of those things. There are tons of different variations of peppermint bark. Most center on crushed peppermint candies in white chocolate or white candy coating. A few more will include peppermint extract. These recipes are good but it doesn't take that much more work to turn this into a treat people will rave about. The peppermint bark I make has two layers of chocolate plus peppermint extract and is topped with crushed candy canes. I like this recipe because of the combination of chocolate and peppermint. Most barks made with white candy coating or white almond bark have vanilla flavoring that you may or may not be able to taste. This recipe balances the peppermint flavor with the chocolate, you will taste both. Also, the dark and white layers plus the crushed candies looks cool and professional. People will think you ordered it from a catalog.

I also like this recipe because it is very easy to change. The bottom layer of chocolate can be anything you want: dark, semisweet, milk, etc. You can add more or less peppermint extract. The crushed peppermint candies can be put in between the layers or swirled in the white chocolate. Flip the dark and white layers or make it in a pan half the size and cut the thicker bark into smaller, bite-size pieces. You can do anything you want to make this recipe your own.

Peppermint Bark

Makes just under 2 lbs of candy

1 lb (16 oz.) chocolate (I use dark)
12 oz. white chocolate
3/4 tsp. peppermint extract
Ten 6-inch candy canes

Bring water to a boil in the bottom of a double boiler. There should be some space between the water and the upper portion of the double boiler. In the meantime, line the bottom of an 11′ by 17′ or similarly sized cookie sheet with sides with aluminum foil or wax paper. Once the water is boiling remove it from the heat and replace the top of the double boiler. Put about 3/4’s of the chocolate in the double boiler first and melt until it is smooth. Add in the rest of the chocolate and 1/2 tsp. of the peppermint extract. Stir until all the chunks have melted. Pour the melted chocolate into the lined cookie sheet and spread so the thickness is just under a quarter of an inch. Let the chocolate sit for a moment so it cools slightly and then place the cookie sheet in the refrigerator for 20 minutes. While the first layer chills, crush the candy canes. I usually start with ten 6-inch candy canes. If this is not enough for coverage, you can always do more. The size of the broken candy canes should be about the size of a pea. Take the bottom layer of chocolate out of the refrigerator so it warms slightly before the second layer is applied. Again boil water in the bottom of the double boiler. Clean out the upper portion of the double boiler with hot water only, no soap, and dry thoroughly. Once the water is boiling, remove it from the heat and put the top of the double boiler back on it. Place 3/4’s of the white chocolate into the double boiler and stir until it is melted. Add the remaining white chocolate and 1/4 tsp. of peppermint extract and stir until smooth. Pour this evenly over the first layer of chocolate. This layer will be thinner than the first. Sprinkle the top with the pieces of crushed candy canes. Again let it sit for ten minutes before placing it in the refrigerator to set. After an hour the bark should be ready to be broken into pieces. Store in an airtight container in a cool place or freeze. Allow it to come to room temperature before serving.

Just a note on crushing the peppermint candies. I place the candy canes in a freezer bag and use a hammer to break them to the size I want. It’s fun to take out your frustrations and beat the bag of candies against the counter top as some sources recommend but I don’t. First, I've found this method doesn’t break the candies evenly and you use more (and waste more) candies. The other issue I have is the broken candies tear even the stronger freezer bags and by the third hit, clouds of powdered peppermint candies are covering the counter top. Using a hammer or meat tenderizer will allow you to control how the candies break and avoid serious clean-up.

As posted at Sugar Savvy.

Thursday, November 16, 2006

I enjoy doing this site

Coming up with ideas for posts and then actually making them is a lot of fun. They say that when you do something you love it shows. I don't know who 'they' are but the sentiment is correct. Somebody did notice. The good people over at the Well Fed Network noticed and offered me a chance to be a contributor on two of their sites: Just Baking and Sugar Savvy. The Well Fed Network is a collection of fifteen food and wine orientated sites dedicated to bringing you high quality articles and ideas you can use.

I will let the sites describe themselves:
Just Baking - Fresh from the oven, we'll be talking about cookies, cakes and breads, and we won’t stop there.
Sugar Savvy - Fabulous content on chocolate, the latest candy bars, gum flavors and much more in the world of sweets.

So come on by, check them out. I should have my first posts up in a short while. I've added links to those sites in the "Sites that inspire me" section on the right side of your screen.